Introduction
The sound of a knitting machine running smoothly is comforting. It’s a soft, steady rhythm that reminds you of tradition, history, and the joy of making something with your own hands. For many crafters, a vintage Gearhart sock knitting machine isn’t just a tool. It’s a memory. A treasure left behind by family. Or a piece of history discovered in a thrift shop that feels worth saving — especially when modern solutions like gearhart sock knitting machine cylinder and ribber 3d print make it possible to bring such machines back to life.
But restoring one of these machines is not always easy. Many are missing essential parts. Some sit silently because the cylinder is damaged or the ribber doesn’t function anymore. And original parts are rare, expensive, or nearly impossible to find.
That moment—when you want to bring a machine back to life but cannot find the parts—creates a mix of frustration and sadness. It feels like holding a beautiful instrument you cannot play.
Today, things are different. Thanks to modern technology, you can revive your beloved Gearhart machine with one powerful innovation: 3D printing. Makers around the world now create or download custom-designed replacement parts—including the gearhart sock knitting machine cylinder and ribber 3d print—and restore machines that once felt impossible to fix.
This article explains everything in simple, emotional, and practical ways. No complicated language. Just clear guidance to help you move from confusion to confidence.
What Are Gearhart Knitting Machine Parts?
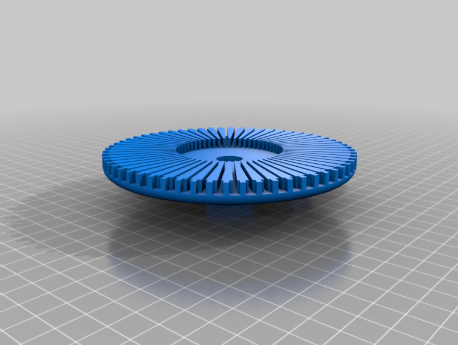
A Gearhart sock knitting machine is one of the earliest circular sock knitting devices used in homes nearly a century ago. It includes:
- A cylinder that holds needles
- A ribber that helps create ribbed stitches
- A tension system
- A crank mechanism
- Various cast-on tools
Over time, these parts may crack, warp, rust, or get lost.
A cylinder or ribber is central to the machine’s ability to knit. Without them, the machine is silent.
Why This Topic Matters Today
People search for these parts for emotional and practical reasons:
- They found a family machine and want to restore it.
- They want to start a small handmade sock business.
- They enjoy vintage crafting and want a working machine.
- They can’t find expensive antique parts.
- They want affordable, modern replacements.
3D printing gives them hope. It turns rare parts into accessible solutions.
Real-Life Examples
A grandmother’s machine found in storage
Someone finds an old Gearhart machine in a wooden box. The metal is still beautiful, but the cylinder is missing. Without 3D printing, the machine would remain a decorative piece. With it, the machine becomes part of the family again.
A small business owner with limited budget
Buying rare antique parts may cost hundreds of dollars. 3D printing offers replacements for a fraction of the price.
A young crafter learning knitting for the first time
They want to experience traditional sock-making but cannot afford vintage parts. A printed cylinder solves the problem.
Collectors and restoration hobbyists
Being able to print parts allows them to save more machines from being thrown away.
This is why people care. It connects generations, creativity, and the joy of making something warm and meaningful.
Benefits, Pros, and Key Features
1. Affordable and Accessible
Original Gearhart parts are rare. Some sellers ask extremely high prices because collectors compete for them. 3D printing changes everything. Instead of spending hundreds, you spend a fraction.
This gives every crafter beginners and experts alike a chance to own or restore a working machine.
2. Customization Options
With 3D models, you can:
- Adjust needle slots
- Modify stitch size
- Optimize yarn compatibility
- Experiment with needle counts
- Personalize ribber height
Traditional parts cannot be modified without expensive tooling. 3D printing gives freedom.
3. Easy Replacement Anytime
If a part breaks, it’s no longer the end of the world. Print a new one. Test new versions. Update when needed. This reduces stress and encourages creativity.
4. Preserving Vintage Machines
These machines are pieces of history. Many were made before our grandparents were born. Restoring them is like giving life back to something old and precious.
3D printing helps preserve craft heritage.
5. Durability with Modern Materials
PETG, ABS, and even nylon filaments offer strong, flexible results. Many crafters report that printed parts last long when used correctly.
How It Works: Step-by-Step
Step 1: Measure Everything Carefully
If your original part is missing or broken, measure what remains:
- Diameter
- Needle slot width
- Height
- Ribber spacing
- Rim thickness
Even small inaccuracies affect stitch formation.
Step 2: Find or Design a 3D Model
Many creators share models online. If you prefer custom work, use design tools like:
- Fusion 360
- Blender
- Tinkercad
Choose models that others have tested for accuracy.
Step 3: Select Printer Material
Different filaments affect performance:
- PETG → strong, flexible, ideal for stress
- PLA → easy to print, but may wear faster
- ABS → durable but requires careful heating
- Nylon → excellent strength but harder to print
Most crafters prefer PETG for cylinders and ribber parts.
Step 4: Print Slowly for Precision
Speed ruins precision.
Use:
- 0.12–0.20 mm layer height
- Slow perimeter speed
- 100% infill for structural areas
- Good cooling for slot edges
Your machine’s performance depends on print quality.
Step 5: Test Fit the Part
Insert the cylinder or ribber and rotate the crank gently. Watch for:
- Wobbling
- Tightness
- Needle drag
- Friction
Sanding small imperfections creates smoother movement.
Step 6: Knit a Sample
Start with simple yarn. Knit slowly. Watch needle behavior. Adjust tension or reprint if needed.
When it runs smoothly, you’ll feel a sense of satisfaction—a machine once silent now creating fabric again.
Tips, Best Practices, and Mistakes to Avoid
Use Quality Filament
Avoid cheap filament that snaps or warps. Your knitting machine needs precision and durability.
Print Multiple Test Pieces
Small calibration prints help you perfect the design before using lots of filament.
Keep the Machine Clean
Dust, oil residue, and fuzzy yarn fibers can affect performance. Clean regularly.
Avoid Rushing
Running the machine too fast can cause needle jams. Take your time, especially with a new printed part.
Check Online Communities
Makers often share tested designs, troubleshooting tips, and improved part models. Their experience saves you hours of trial and error.
Conclusion
There is a special joy in restoring something old. A feeling of honoring the past while using the tools of the present. A feeling that blends nostalgia with innovation. 3D printing isn’t just a technical solution—it’s a way to continue a tradition that has touched families for generations.
A machine that once sat forgotten in a corner can now create warm socks again. A crafter who thought their machine was beyond repair can feel hope again. A newcomer can step into the world of circular knitting with confidence.
Restoring a Gearhart machine is not just about metal and parts. It’s about connection, creativity, and bringing something meaningful back to life.
FAQs
Are 3D-printed cylinders and ribbers strong enough for real knitting?
Yes. When printed with strong materials like PETG, they perform very well.
Do I need to be an expert in 3D design to make these parts?
No. Many ready-made models exist. Beginners can use them easily.
Can 3D-printed parts damage my needles?
If printed accurately and smoothly, they work safely. Sand rough edges if needed.
Which filament lasts the longest?
PETG and nylon provide the best balance of strength and flexibility.
Is it expensive to print these parts?
No. Printing costs are far lower than buying rare antique replacements.